Below is my detailed QMK tutorial for all you keyboard nerds out there!
We’ll dive into:
- QMK Toolbox
- The QMK Configurator
- How to flash your keyboard
- QMK Macros & RGB settings
- ADVANCED custom coding QMK
I’ve set up dozens of QMK-compatible keyboards over the years, and I also want to spread the word about just how powerful QMK can be!
Most people only scratch the surface, but we’ll get fancy ⌨️
What Is QMK? (And What Can You Do With It?)
QMK (Quantum Mechanical Keyboard) is an open-sourced suite of tools that allow users to customize the firmware of their mechanical keyboard.
QMK is not a programming language itself, but rather a software/firmware project. There are several QMK tools, such as:
- QMK Configurator – a browser-based interface for customizing your keyboard (see more below)
- QMK Toolbox – a downloadable software for flashing your keyboard’s firmware
- Via – A separate software that allows a more user-friendly interface for using QMK, and also doesn’t require flashing the keyboard after changes.
You can find the homepage for the project at https://qmk.fm.
What can you do with QMK?
QMK firmware allows you to:
- customize key bindings
- create custom macros
- set up “layers” for different key bindings, accessible through a shortcut, etc.
- program rotary knob functions
- adjust RGB settings
- and more!
What is the QMK configurator?
The QMK configurator is a browser-based software that allows you to customize & modify your keyboard keymap and export that firmware (or save that firmware to edit later).
You can then flash this firmware to your computer (in a number of ways, see below).
You can use the QMK configurator to:
- Test your keyboard
- Import other people’s firmware, key binds, etc
- Download your keymap JSON file to import later into the configurator
- Edit mouse settings as well
What is the QMK toolbox?

The QMK toolbox is a downloadable software for “flashing” your keyboard’s firmware.
You will make customizations to your firmware using a tool like the QMK configurator (or by editing the code manually), and you will load those keymap files into the QMK Toolbox to actually push the changes to the keyboard (called “flashing”).
The toolbox supports a number of bootloaders, see more below!
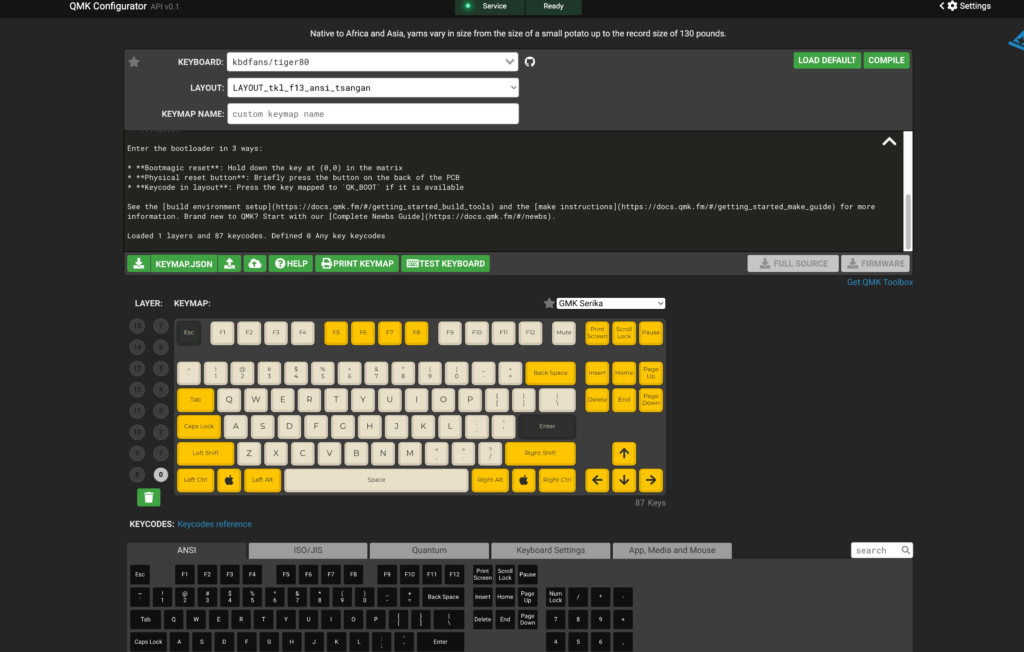
A Full Tour of the QMK Configurator Dashboard

The step-by-step instructions are below, but here are the main area of the QMK configurator, and what they do:
| Top dropdown area | Where you select your keyboard and name this keymap |
| “Load default” and “compile” buttons | Load default resets the keycap to the original one (for your keyboard). Compile is essentially a “pre-export” button that actually SAVES your customized keycap for export. |
| Text area just below that | Some notes specific to your keyboard & firmware |
| Button row | On the left, you can save your changes as a .JSON file for importing into the configurator again. You can also import keycaps here, as well as access a printable version of your layers and test your keyboard. To the right, the “download firmware” button will become available once you’ve compiled. This downloads the .bin or .hex file! (i.e. your keycap) |
| Layer box | You can access different layers of your keyboard for programming. Layers are usually accessible via function key or shortcut (which you can also customize here in QMK!) |
| Keycap | This shows your keycap. You can click on individual keys to add/change a keycode, or literally drag-and-drop up from the keycode section below. You can also change the keycaps visible if you want. |
| Keycodes | These are all of the keys & functions available for you to bind! Note that there are several different tabs, including mouse settings, RGB backlighting settings, and more. |
How to use the QMK keyboard configurator:
Let’s dive into customizing your keyboard layouts, functions, macros, lighting, and more!
1 – Find your keyboard details & ID
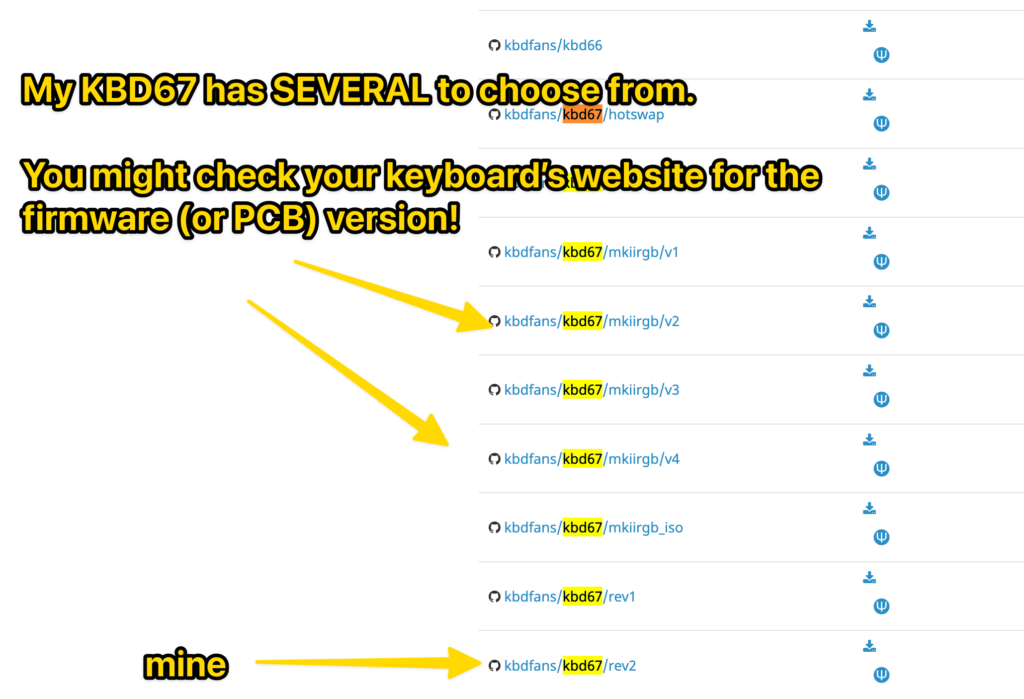
First, search the official supported keyboards list to find your exact model and ID.
However, several keyboards might actually have multiple firmware profiles listed (different PCBs or versions, etc), so you might have to check your keyboard’s website, etc!
ALSO–not all keyboards are QMK/Via compatible! You probably already knew this, but you can check the sales page for the keyboard you bought. They’ll usually list whether it’s QMK/Via compatible or not!

Once you find your keyboard, you might want to write down the MCU (Microcontroller) ID! It’s found in the rules.mk file under your keyboard.
You’ll use this with the QMK toolbox later.
2 – Head to the QMK Configurator & enter your keyboard, layout, and name.
Head to the configurator and find your keyboard from the dropdown list. Select the layout that your keyboard has (there’s probably only 1 to choose from)!
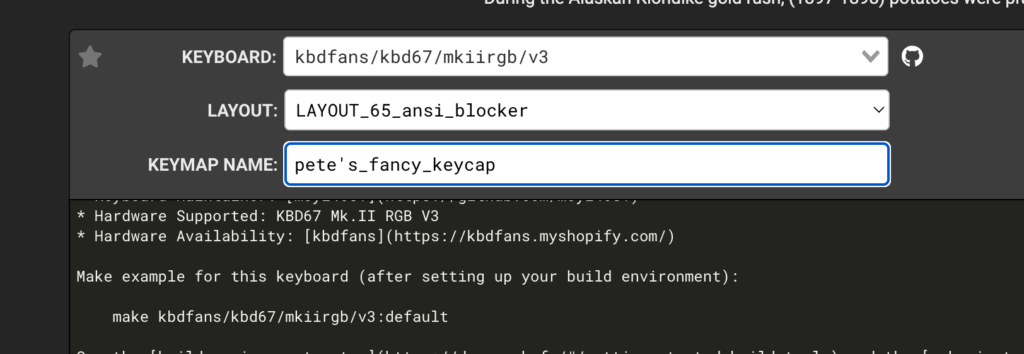
Then, name this keymap whatever you like.
3 – Create Your Keymap
There are several ways to make changes to your keymap:
- Click any key, then click the keycode you’d like to assign to it
- Drag the keycode to the key
If you want to learn more about the different keycodes, head here for the complete list and explanation.
QMK RGB Keycodes:
Here are the more popular RGB backlighting keycodes, found under the “keyboard settings” tab:
- RGB Toggle 👉 turns the RGB on and off
- RGB Mode+ and RGB Mode- 👉 these two keycodes move forward and back through the different RGB modes your PCB has
- Sat+ and Sat- 👉 Makes the lighting more or less colorful (saturation)
- Bright+ and Bright- 👉 Makes the RGB brighter or softer (brightness)
- Effect+ and Effect- 👉 speeds up or slows down the RGB effect
QMK Quantum Keycodes:
There are a TON of quantum keycodes that get really advanced, but here are the more popular keycodes you might want to keybind:
- Reset 👉 Holding this will enter your keyboard into bootloader mode, which is needed for flashing your keyboard! 99% of QMK-compatible keyboards come with this bound to some key, somewhere.
- MO 👉 hold down this key to access a different layer
- TG 👉 Tap this key once to toggle the layer on, and then tap again to return to the previous layer
- TO 👉 Tap this key to toggle the layer on, but tapping it again will NOT go back to the previous layer
- OSL 👉 Switches to the layer for one keypress
- LT0 – LT15 👉 Tapping just executes the “normal” keybinding, but holding it down accesses a layer! Many people bind this to their spacebar or shift keys.
- LSft_T and RSft_T 👉 Holding the shift key activates shift (for typing capital letters, etc), but tapping the shift keys activates a keybind!
Once you’ve customized your keymap, it’s time to actually IMPLEMENT this to your actual keyboard.
Optional: Print your keymap!

You can access a print-friendly version of ALL of your keyboards layers! This can be helpful to reference later if you forget where stuff is.
4 – Compile your keymap & download the firmware
Ready to push your changes live? The first step is clicking the “compile” button.
This creates the firmware file that you’ll download.
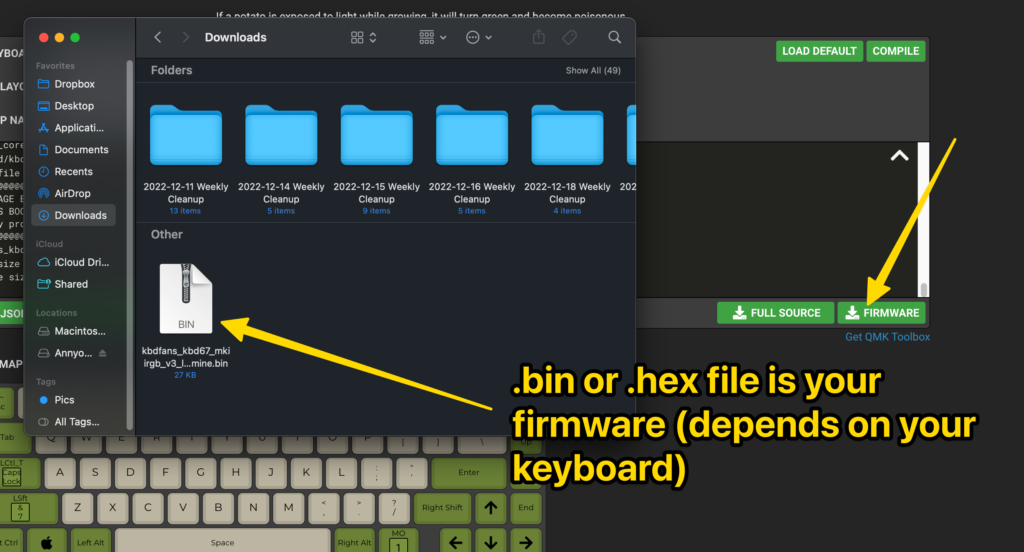
Your keyboard firmware will likely be one of two formats:
- .bin
- .hex
NOTE: You can also download ALL of the QMK files (not just for your keymap, but everything), using the “full source” button. See the advanced section below for more on that stuff!
If you’ve downloaded your bin or hex file, you’re ready to flash your keyboard!
How to Flash Your Keyboard (Using QMK Toolbox)
There are several ways to flash your keyboard:
- Via the QMK Toolbox software (see below)
- Using a CLI (command line interface like the Terminal, Bash, etc)
- Using a tool like Via or Vial to flash in real-time
Below we’ll walk through using the QMK Toolbox
1 – Download QMK Toolbox
It’s free software available for Mac and Windows, and you can grab it here.
1.5 Windows Only – Install Drivers
Mac users can skip this step.
When you first open QMK Toolbox on WIndows, you should be prompted to install the drivers. If you weren’t prompted, you should be able to right-click in the QMK Toolbox and click “install drivers.”
2 – Load your firmware file into the toolbox

In the “local file” section, select your downloaded .bin or .hex file.
Alternatively, you can also load the default keymap by searching the “keyboard from qmk.fm” section for your keyboard! Just in case you wanted to reset to the default, etc.
3 – Select your MCU (microcontroller)
This is likely already selected for you!
But if it’s not, choose the correct one (remember that you found this in the rules.mk file in your keyboard’s github repo).
4 – Put your keyboard into bootloader mode

Here’s where things can get tricky! Next you’ll need to enter your keyboard into bootloader mode, which will allow it to be flashed.
How to get your keyboard into bootloader mode:
First, this depends on your keyboard. Your first task is searching Google (or your keyboard’s website) for the proper bootloader technique.

If you can’t find anything, here are the most common ways to get a keyboard into bootloader mode:
- Press the “reset” key bind (this is usually accessed via a modifier key. Google this to see if your keyboard has one by default)
- Press the physical reset button located on the bottom of your PCB. If your PCB is inside a case, you obviously won’t be able to access this easily.
- Hold Space + B for a few seconds
- Hold Escape for a few seconds
- Unplug your keyboard, hold Space + B, then plug back in and hold for a few seconds
- Unplug your keyboard, hold Escape, then plug back in and hold for a few seconds
- Hold down both shift keys and press Pause
If none of these work, you’ll want to reach out to customer support for your keyboard!
Once you’ve put your keyboard into bootloader mode, QMK Toolbox should give you a yellow message indicating that it’s connected!
You’re now ready to flash.
5 – Flash your keyboard
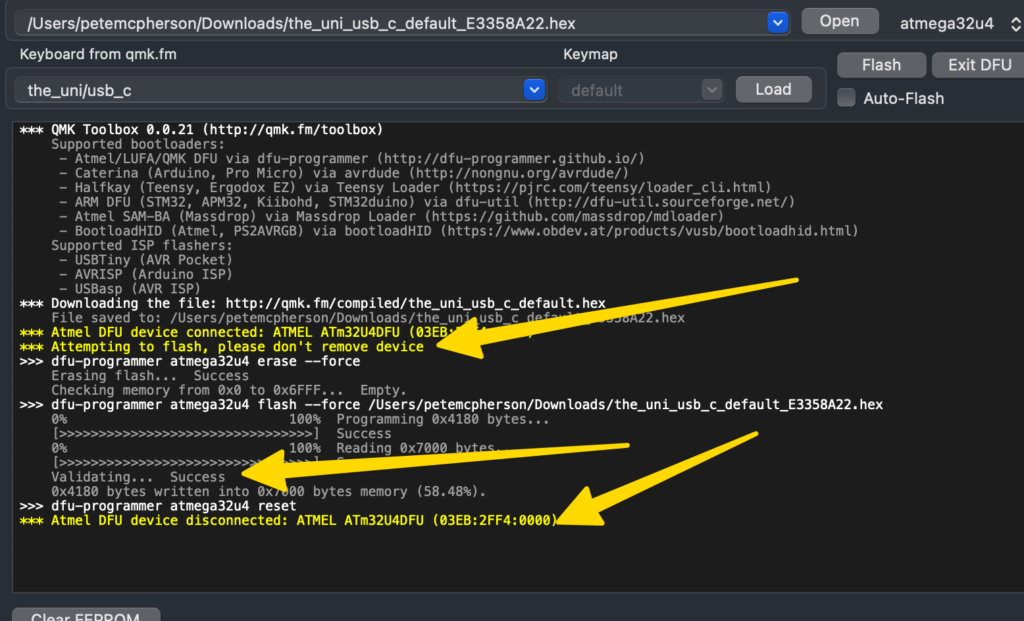
If your keyboard is connected, and you’ve double-checked the file you’ve loaded, you can click “flash” to flash your keyboard!
It will take a few seconds, and you should see a yellow disconnect message when it’s done.
QMK Firmware Troubleshooting
Even while writing this blog post, I had a difficult time flashing my KBD67 Lite R3 keyboard. (It turns out this keyboard doesn’t work with the QMK Toolbox!!).
If you’re having trouble finding your keyboard in the supported keyboard list…double-check with the manufacturer’s website or documentation to make sure it’s QMK compatible!
If you’re having trouble using the configurator…
- Make sure you’ve loaded the proper keyboard into the configurator
- Check the official QMK F.A.Q.s page
- Reset the keymap by loading the default layout
- Refresh the browser?
If you’re having trouble flashing your keyboard with the QMK Toolbox:
- Refer to your keyboard documentation to make sure it CAN use the Toolbox! Some keyboards don’t (or can’t), and those SHOULD have additional instructions for flashing QMK firmware
- Try flashing the keyboard with CLI, instead of the Toolbox. It is a bit techier, but it’s not hard
- Try downloading and using Via (or Vial). This is the easier choice for most people!
QMK F.A.Q.s
How do I configure my QMK keyboard?
The simplest way is to use a free software called “Via,” which allows real-time customization and flashing of your keyboard. Alternatively, you can use the QMK Configurator, a browser-based tool to customize your keymap and download the firmware. You will then “flash” this firmware using the Command-Line Interface, or a tool like the free QMK Toolbox.
How do I use QMK configurator online?
If you’ve checked the supported keyboard list to make sure your keyboard is QMK-compatible, you’ll first select your keyboard from the dropdown list in the configurator. Then, you can drag and drop the different keycodes (for keystrokes, lighting controls, layer functionality, and more) to the keys on your keyboard. Then, you will click the compile button to be able to download the compiled firmware. Last, you’ll use a separate program, the QMK Toolbox, to flash the firmware to your keyboard.
What code does QMK use?
QMK uses a programming language called “C.” C is an older general-purpose programming language that has been around since the 1970s.
What does QMK firmware do?
QMK is a project that allows users to customize many functions of their keyboard & mouse, including key binds, macros, RGB lighting controls, layer functionality, and more. You can use tools like the QMK Configurator to customize your keycap, then tools like the QMK Toolbox to flash this firmware to your keyboard.
Is QMK firmware good?
Yes, absolutely. QMK is supported by a growing number of keyboards and software tools that allow you to easily customize your keyboard’s firmware.
What is the difference between QMK and Via? (for a keyboard)
QMK is the firmware project for customizing your keyboard. Via is one tool that simply adds a friendly user interface for customizing QMK keyboards. Without Via, you will have to manually compile firmware files with keycaps, and then flash this firmware to your keyboard. Via supports customization and “flashing” in real time.
*
Questions about QMK? Ask them below and I promise I’ll respond!