If you’re new to mechanical keyboards, you’ve probably heard about lubing & filming your switches.
But what ARE switch films, and how do you use them for a better sound?
Here’s how to film keyboard switches:
- Check your switches to determine if they need films
- Choose your films based on thickness and purchase them
- Disassemble the switch
- Gently insert the switch films
- Re-assemble the switches & test to make sure they work
As a long-time keyboard nerd, it is my not-so-humble opinion that switch films are underrated, and can drastically improves your keyboard experience.
Let’s get into the details.
What do switch films do?
Switch films are thin pieces of plastic (or other materials) that reduce the amount of wobble between the top and bottom housing of mechanical switches.
If the housing of the switch isn’t really tightly clasped together, the 2 pieces of the housing can wobble–causing scratchy sounds and even hurting how the switches feel.
Switch films are inserted between the bottom and upper housing–making the connection much tighter and reducing the wobble. This can lead to a drastically better sound and feel, depending on the switch!
PRO TIP: There are actually 2 different types of switch wobble:
- Stem wobble – The colored stem is supposed to wobble back and forth. This is ok and natural! Switch films don’t affect stem wobble.
- Housing Wobble (Top Wobble) – This wobble is what switch films are for–affecting the connection between the top and bottom housing of the mechanical switch.
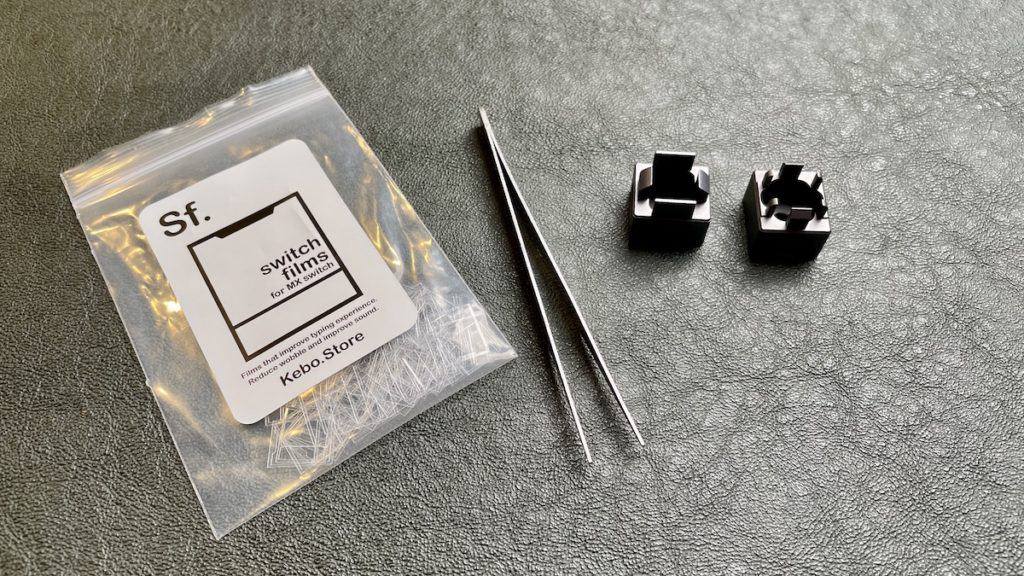
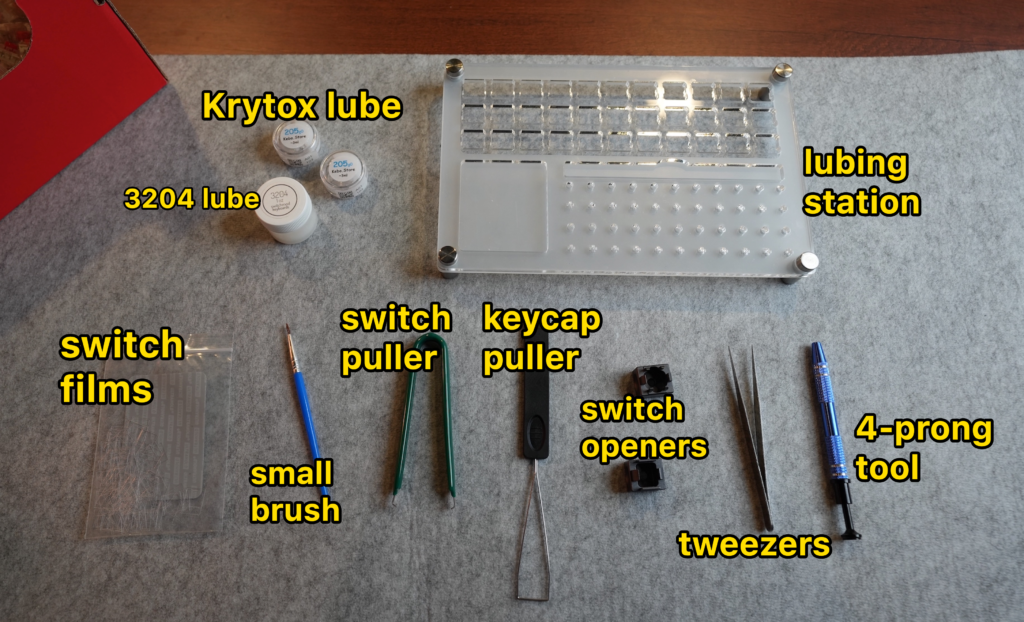
Tools Needed for Filming Switches
Here’s what you’ll need to film your keyboard switches:
| Tool | Notes |
|---|---|
| The switch films | (see below for our buying guide. They’re not all alike!) |
| Switch opener | A handy tool to open the actual switch housing (you can use a screwdriver, but it’s far more difficult. Make sure to get a switch opener that matches your switch, i.e. a Kailh-style opener or MX-style opener) |
| Tweezers | Switch films can be finicky and annoying to handle with your fingers. Tweezers make things a LOT easier. |
We’ll go over which films to purchase below.
Let’s move on to how to film switches:
Step 1 – Check if your switches even need filming
Believe it or not–not all switches need filming, and some might sound and feel WORSE from adding switch films.
Here’s how to check if you need films:
- Hold your switch from the bottom half (securely). If they’re installed in your keyboard still, even better
- Using tweezers, wiggle the top housing of your switch
- Ignore the stem wobble
Does your top housing wiggle or wobble? How much?
If there was…
- NOT any wobble (the housing connection felt nice and tight). You probably do NOT need any switch films!
- A tiny bit of wobble, you might benefit from some thin switch films
- A LOT of wobble, chances are high that switch films will drastically improve your keyboard, and you should probably grab some medium or thick films.
Step 2 – Purchase your switch films


Based on the amount of wobble you discovered in Step 1, you should have a good idea of how thick your switch films should be…
- No wobble at all – no films
- Low wobble – Stick to 0.125mm or 0.15mm thickness
- High wobble – 0.15mm might still be fine, but you also try 0.2mm or 0.3mm (THICK)
You might also consider the material of the switch films.
- Polycarbonate – MOST films are made from high quality “PC” plastic. This is what I use!
- MDI Foam – thicker and feels like paper
- Rubber – The Deskeys films below are rubber (not exactly, but pretty much)
The Best Switch Films
The bottom line is this: the best switch films are the one that best fit your specific switches and the wobble. Make sure to do your research!
That said, here are the switch films I’ve used and can recommend:
| Switch Film | Thickness | Notes |
|---|---|---|
| TX Switch Films | 0.125mm (thin) or 0.15 (medium-thin) polycarbonate | Available in different colors! They’re basically the same films as the Durocks below, but slightly more expensive (since you’ll have to pay shipping). |
| Durock switch films | 0.15mm (medium-thin) polycarbonate | These are soft (what you want!), fit easily, and are widely available |
| Kebo.Store Films | 0.2mm (thick) polycarbonate (different sizes available) | These are a community favorite, as they’ve been around for forever. Very affordable, too! |
| Deskeys Switch Films | 0.3mm (thicker) rubber-like material | These switches supposedly compress more than PC plastic, making them fit into together housings. |
| Gliging MDI Foam films | 0.3mm (thicker) MDI foam | This is a newer material, and is supposed to be more paperlike (allowing it to compress more than PC plastic) |
Yes, there are probably a ton of newer vendors and switch films on the market, but the above recommendations are high-quality and affordable.
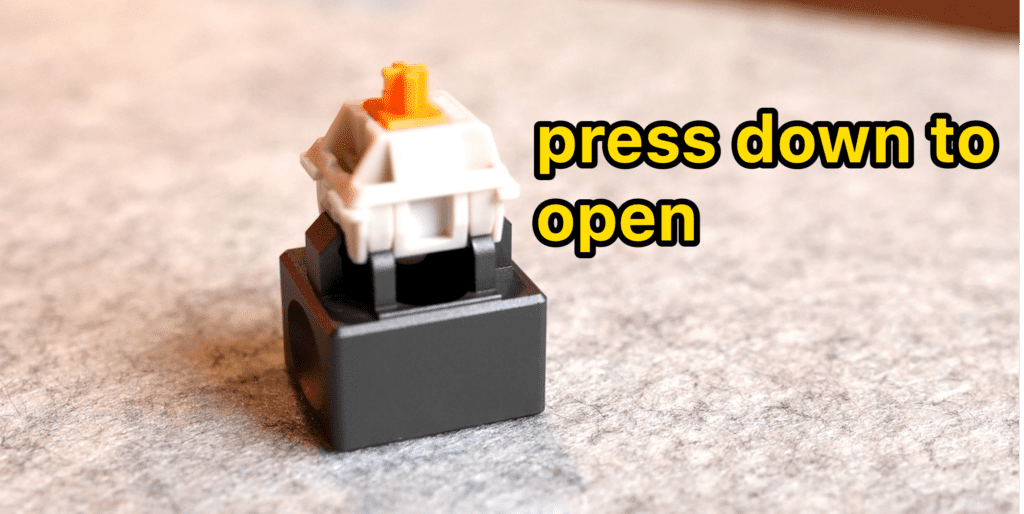
Step 3 – Open the Switches
If you have your switch films in hand, it’s time to install them!
- Grab your switch opener (or a flathead screwdriver)
- Place the switch on the switch opener and push it down (until it clicks open)
- Gently pull the top housing from the rest of the switch
If you’re going to lube your switches (see below), then you might as well disassemble the entire switch (stem, spring, and bottom housing as well).
But if you’re JUST going to film the switches, you can actually leave the stem and spring resting in the bottom housing.
Step 4 (Optional) – Lube the switches
If you want to really take the smoothness of your switches to the next level, we recommend lubing your switches.
No, it’s not necessary to lubricate mechanical switches, though it will usually improve the sound and feel (often making the sound lower in pitch, i.e. “thocky” sounding), and make them feel a tad smoother as well.
The lubing process requires it’s own set of tools (and your Krytox 205g lube of course), so click here to read our full guide to lubing switches.
Step 5 – Carefully place the switch films onto the switch
If you have removed the top housing of your switch, it’s time to install the films
- Use tweezers to pick up the film
- Rotate the film so it’s positioned correctly (see below), with the larger “hole” in the film positioned over the stem/spring part of the bottom housing
- Carefully place the switch film on top of the bottom housing, around all parts of the stem, spring, and stem “shaft.”

Basically, the switch film will go on the outside of everything, and rest on the top of the bottom housing.
NOTE: Once the film is placed on the bottom housing, you still might have to adjust it a bit to make sure the edge of the film lines up with the edge of the housing.
In the video tutorial above, you’ll see that I didn’t do this on accident, but I simply took the switch apart and adjusted the film to line up.
Step 6 – Reassemble the switch
Next, simply reattach the top housing (making sure it’s aligned correctly). Press down gently until it snaps into place.
If you can’t connect your housing tight enough to “snap,” chances are your switch either didn’t need films, or your films are too thick!
If this happens, I’d recommend taking the switch apart again–and then re-installing the film (just to make sure you didn’t screw something up).
If the switch STILL won’t fully re-assemble, you’ll need to remove the switch film.
Step 7 – Install and test the switches in your keyboard
If your switch successfully assembles, it’s time to install it in your keyboard!
Re-install the switch into the keyboard PCB, and test it to make sure it works (open a blank text document or something).
- If it works, congrats! You’ve installed switch films. You might want to compare the sound and feel to UNFILMED switches just for fun 😎
- If the key doesn’t activate, take the switch out and repeat the process of filming
PRO TIP: Before you film all of your keyboard switches, start by filming and testing ONE just to make sure that everything works correctly.
If you’re happy with the way your filmed switches sound and feel, you’re good to go!
Is Filming Switches Worth It?
If your specific switches suffer from housing wobble, yes! Switch films can make a dramatic change to the way your switches sound and feel. The more wobbly your switches are, the more “rattle” you’ll notice, and the more switch films will improve your experience. However, if you test and find that your switches do NOT have housing wobble… you might as well not bother with switch films. The difference will be very small, and films could actually make things worse.
We recommend starting with the Durock Switch Films (they’re cheap and high quality) for most switches.
Switch Film F.A.Q.s
Do all switches need filming?
No, not all mechanical switches need to be filmed. You should check the connection between the top and bottom housing of your switches to see if there’s any wiggle or wobble. If there is, your switch could benefit from switch films. If the housing connection is nice and tight, there’s really no point in installing them.
Are thicker switch films better?
No, thicker switch films are not always better. The thickness of your films should depend on the amount of wobble in your switches. If you have a lot of wobble, use thicker films (0.2mm to 0.3mm). If you only notice a tiny bit of wobble, use thinner films (0.125mm and 0.15mm are the most common thickness).
What size switch film should I get?
This will depend on the amount of wobble between the bottom and top housing of your switches, so be sure to test your specific switches first. If you have a lot of wobble, use thicker films (0.2mm to 0.3mm), but if you only notice a tiny bit of wobble, stick to thinner films (like 0.125mm or 0.15mm). You definitely do NOT want to purchase films that are too thick! They could prevent your switch housings from connecting properly, and the switches won’t work at all.
How do you attach a switch to a film?
First, you’ll want to check the connection between the top and bottom housing of your switch for wobble (if they don’t wobble, you likely don’t benefit from switch films). Then, you’ll take apart your switch (using a switch opener) and carefully place the film on the bottom housing (it will end up sandwiched between the bottom and upper housing), making sure to align it correctly. Then, you put your switch back together (till it clicks together) and test it in your keyboard to make sure it works!
Do switch films do anything?
This depends on the switch, and whether or not it experiences “housing wobble.” If your switch does have housing wobble (meaning, the top and bottom housing of the switch are slightly loose), then switch films can actually make the sound and feel of your switch better. The worse the wobble, the more improvement you can see from installing switch films.